Electromania How to program ESP8266 ESP12E NodeMCU using Arduino IDE
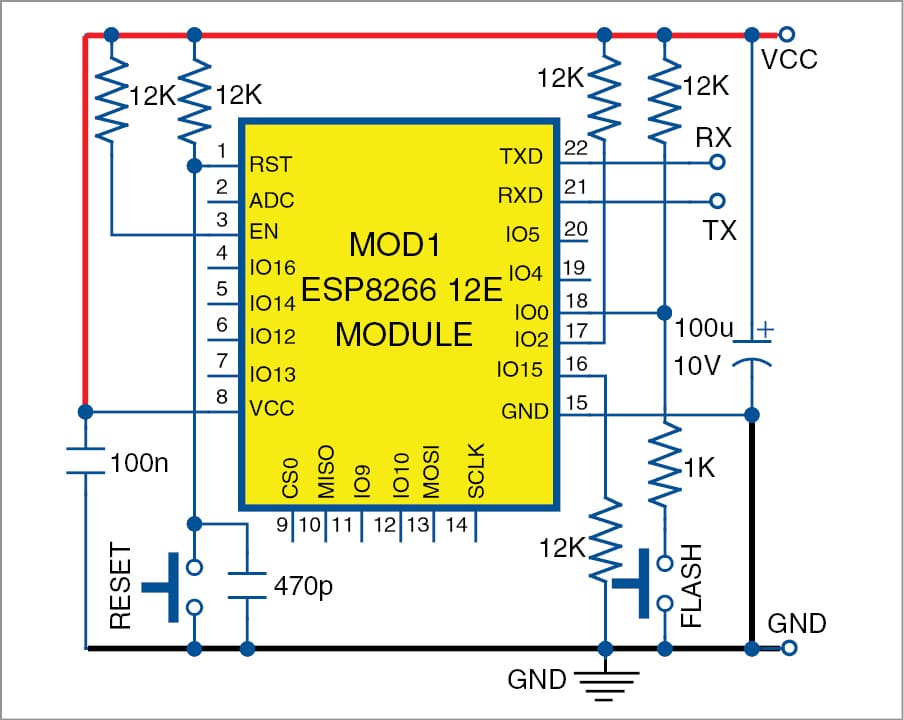
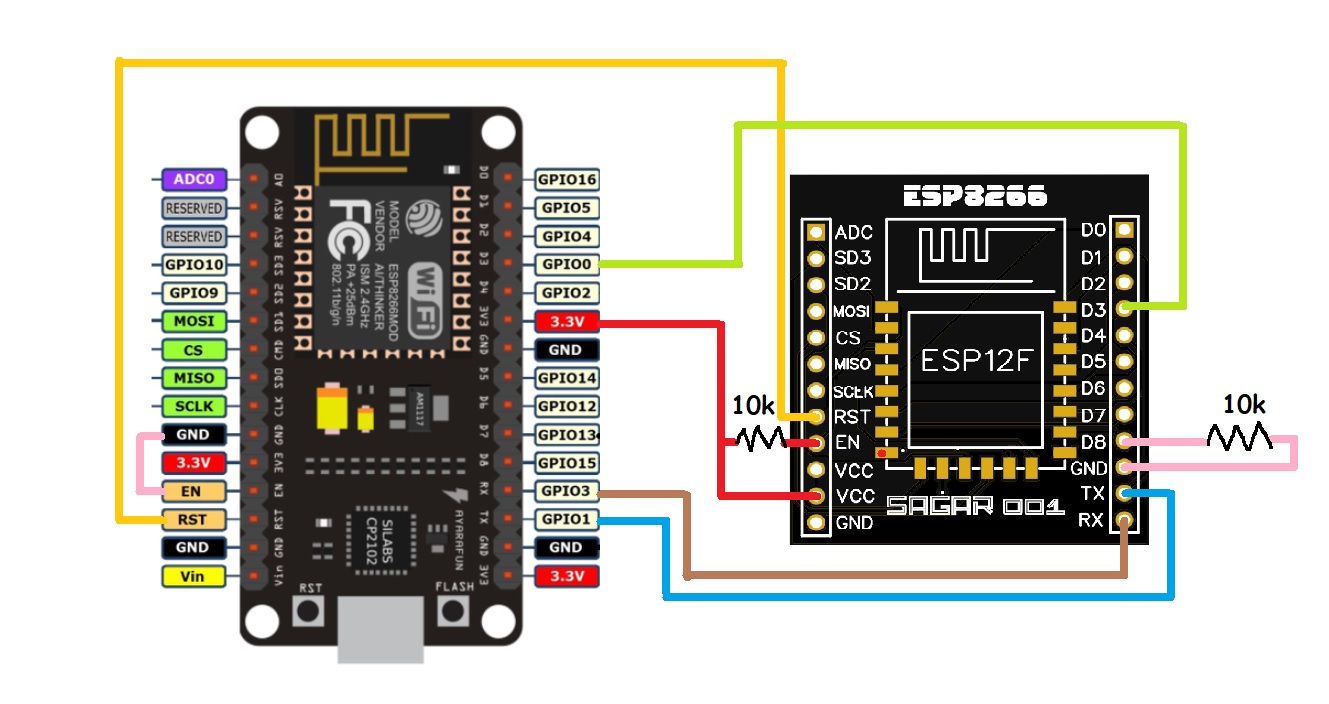
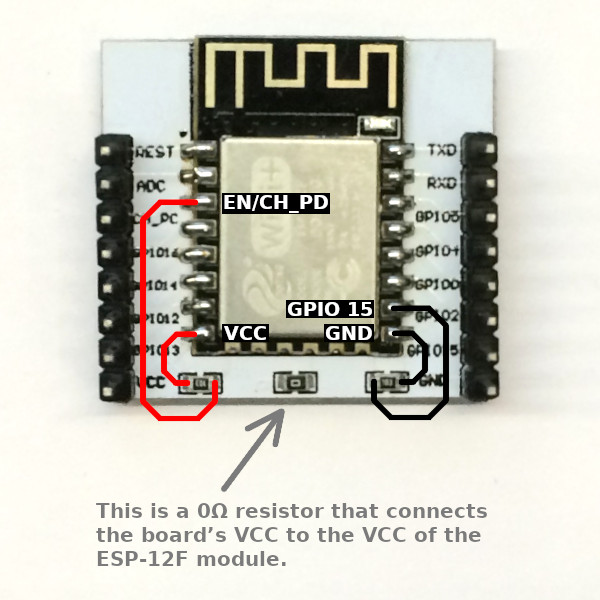
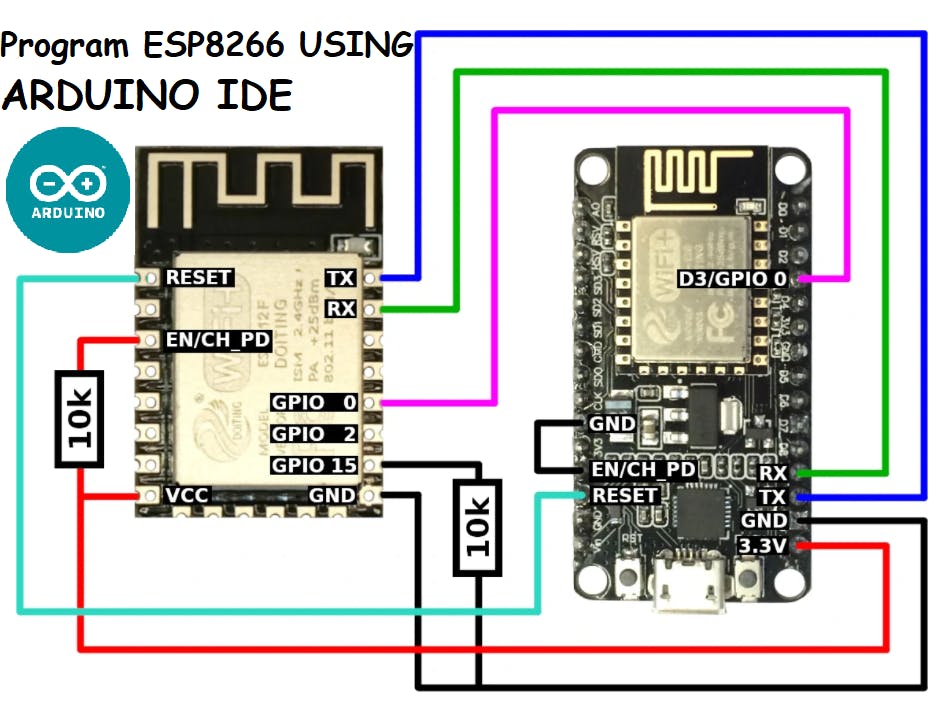
Programming the module To program the ESP12E/F module, you must first put it in Program Mode. you must: - Pulled up RST, EN and GPIO0 pins with 10K ohm resistor. - Pin GPIO15 must be pulled.
Program ESP8266 ESP12E With Arduino Using FTDI Cable Hackster.io
esp8266 12e is a great way to achieve IoT with anything in a very cost effective manner, The ESP8266 is like an Arduino with a builtin WiFI. FEATURES ==> --10 GPIOs D0-D10 & ADC A0 --PWM functionality --Communicaiton = I2C , SPI , 1-Wire
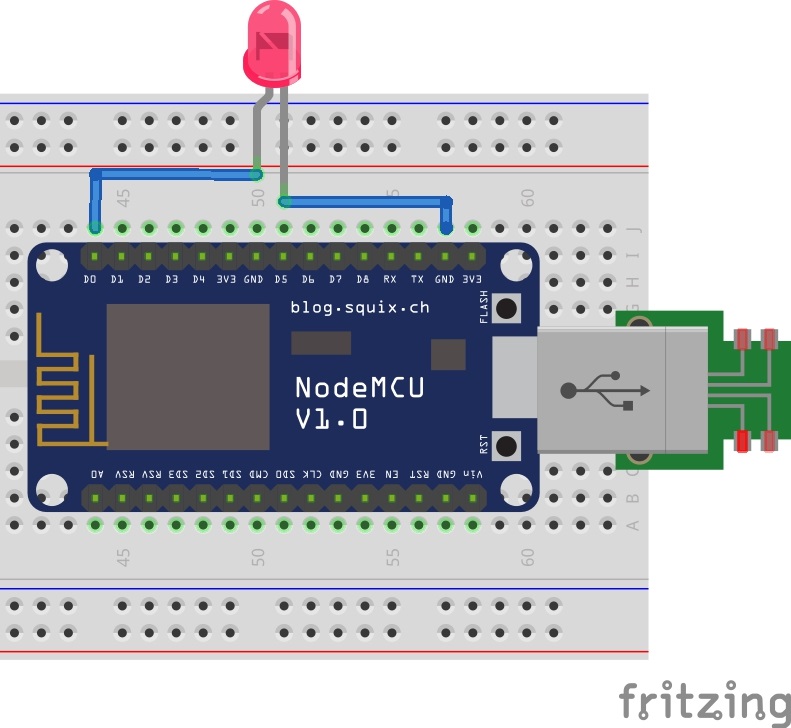
ESP8266 ESP12E/F Digital Output LED Blinking on Arduino IDE Robo India Tutorials
The ESP-12E and ESP-12F (including the NodeMCU) are ESP8266 boards. ESP8266 is a low-cost Wi-Fi-enabled microchip that you can program over a serial or Wi-Fi connection. Programming an ESP-12E / ESP-12F / NodeMCU over Wi-Fi is a Catch-22. You need to run an Arduino sketch capable of receiving code updates over Wi-Fi to upload your code over Wi-Fi.

Wireless ESP8266 12E ESP12E
Step 1: Connecting the ESP8266-12E How Do I Connect This To My Stuff? One of the obstacles people encounter early on with using the ESP8266-12E is that it has only pads, but not any sort of pins, and the pads have a 2 mm spacing pitch.
ESP826612E/F Module Programmer Full DIY Project
Step 1: NodeMCU ESP-12E Pin Mapping First and foremost word of - CAUTION ! * The ESP8266 chip requires 3.3V power supply voltage. It should not be powered with 5 volts like other arduino boards. * NodeMCU ESP-12E dev board can be connected to 5V using micro USB connector or Vin pin available on board.

5 Simple Steps For Programming ESP8266 NodeMCU 12E Using Arduino IDE
Article Contents ESP8266 Microcontroller ESP8266 Module Versions ESP8266 Programming NodeMCU ESP8266 ESP8266-12E NodeMCU Pinout NodeMCU ESP8266 Datasheet Material Needed ESP8266 with Arduino IDE STEP 1: Install CP2102 Driver STEP 2: Install Arduino IDE STEP 3: Configure Arduino IDE STEP 4: Configure NodeMCU Board STEP 5: Flash your First Program
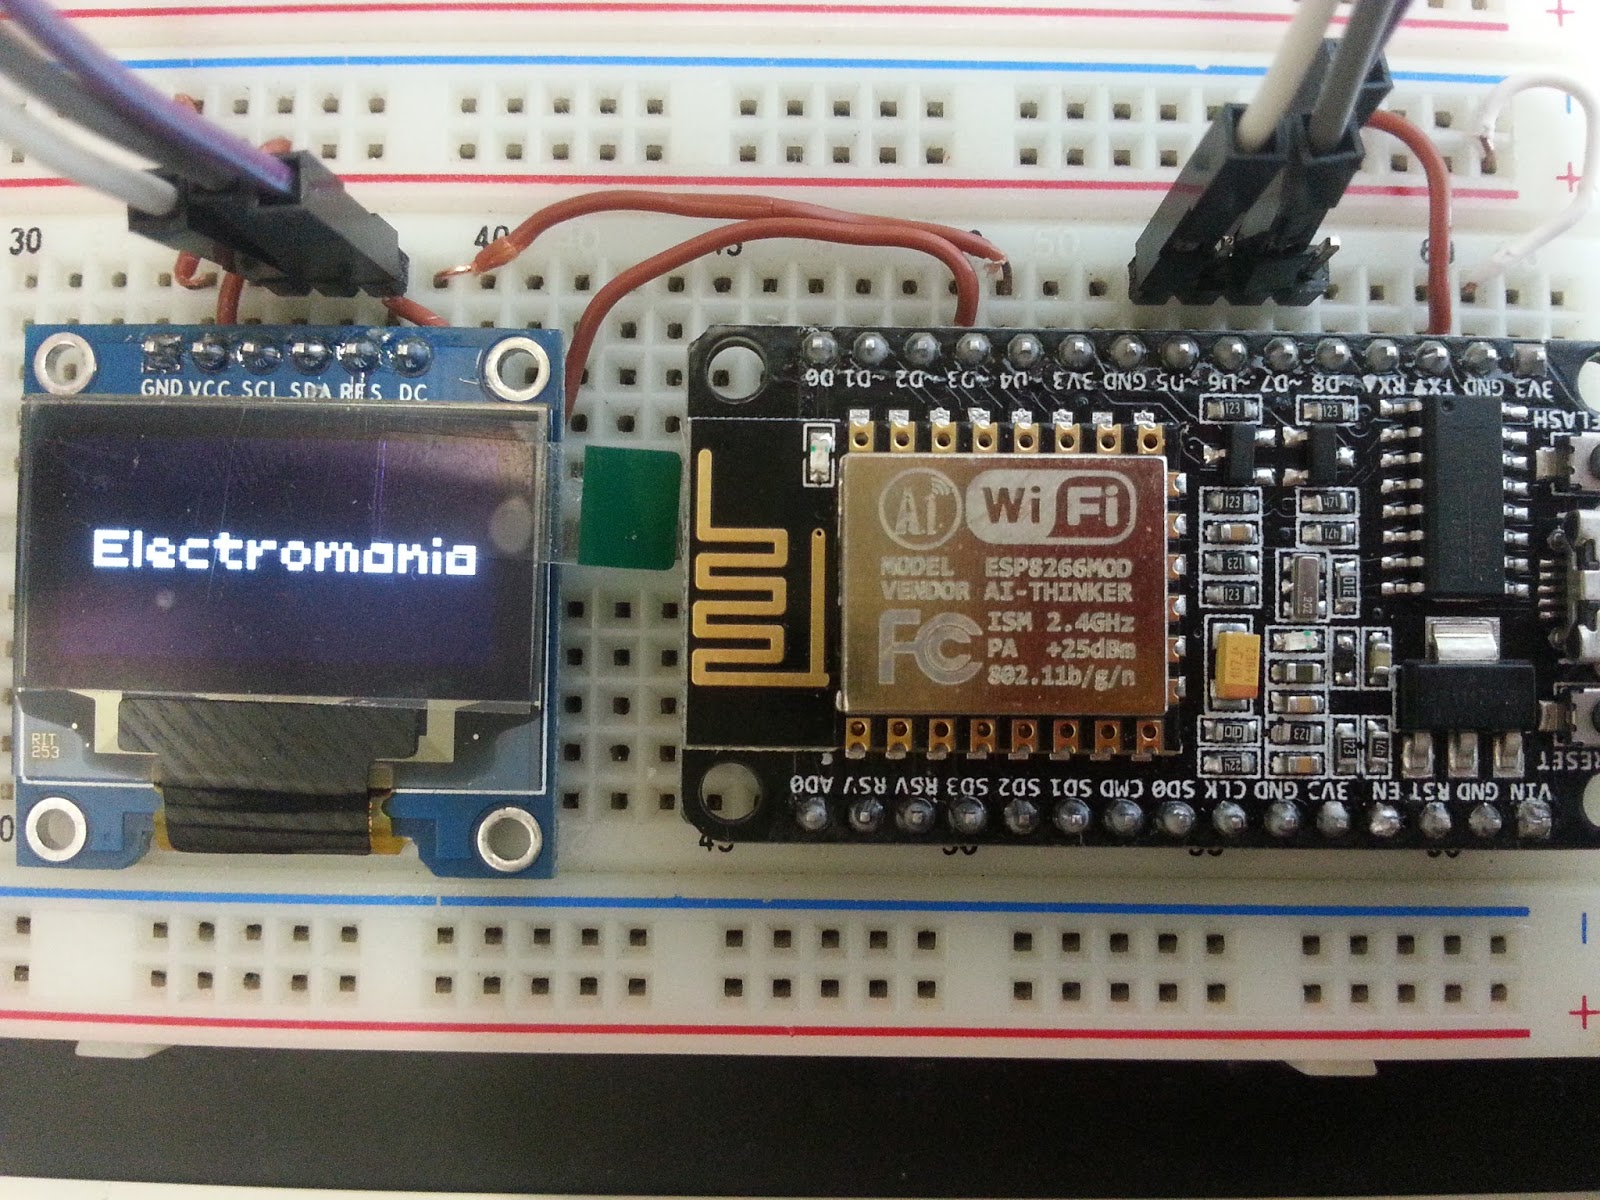
Electromania ESP8266 ESP12E nodemcu 1.0 SPI OLED Display 128x64 on using U8Glib with esplorer
Step 1: Breakout the ESP8266 ESP-12 Onto a Perforated Board The ESP-12 has a 2mm pitch, which means you cannot access all the pins on a breadboard or a perforated / dot matrix directly, which have a 2.54mm pitch (distance between adjacent pins). You could use a Xbee adapter board, but there's an easier way out.
Programming ESP12E / ESP12F / NodeMCU With Arduino IDE Circuit Journal
Esp8266-12E is a Wi-fi based microcontroller. This is my first project with this type of microcontroller, just getting started with this. Here are some of the specifications: 1) 32bit MCU 2) 10 Bit ADC (analog to digital converter) 3) 7- GPIO (Input/Outputs) 4) Wi-Fi 2.4Ghz 5) Operating voltage: 3v to 3.7v 6) Operating current: 80mA
Files How to program ESP826612E using Arduino IDE Hackaday.io
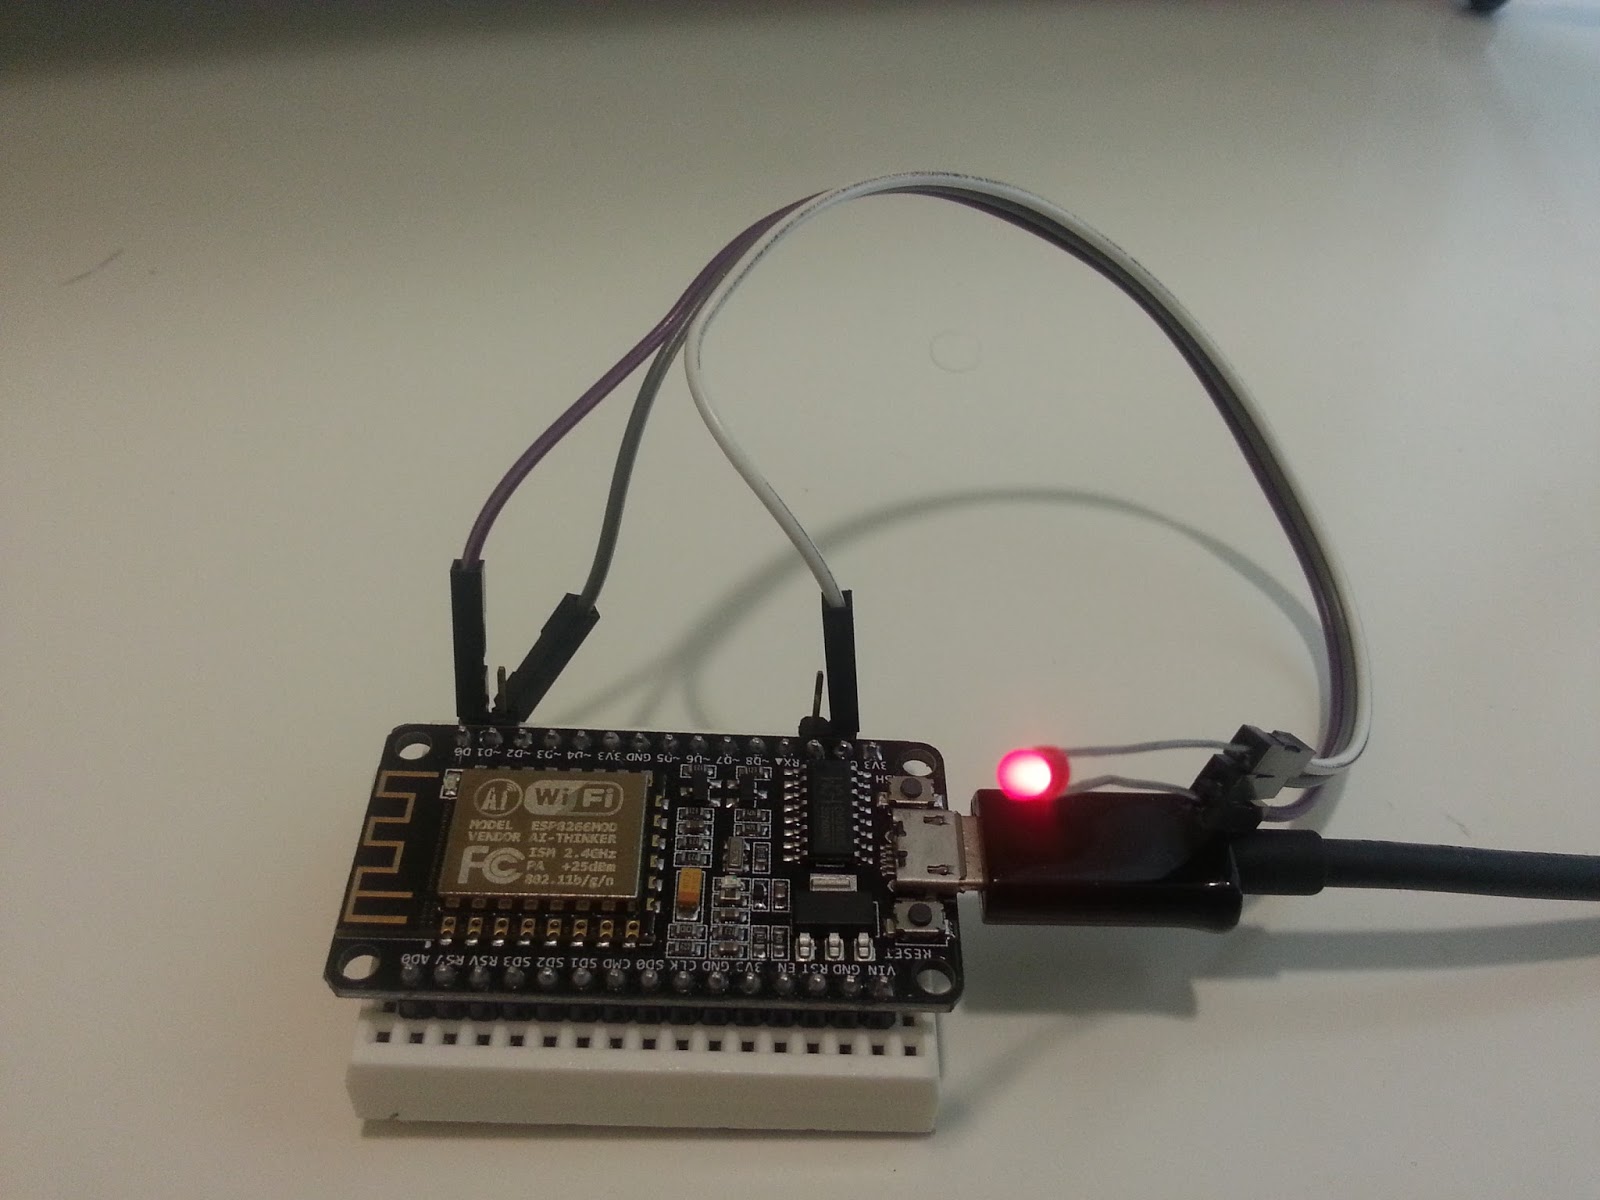
Hi guys, today I'm going to discuss Esp IoT module features and program this module using Arduino IDE. Usually, a Usb to TTL programmer can do the job perfectly but in order to make this simple we are using NodeMcu. Esp8266-12E is a Wi-fi based microcontroller. This is my first project with this type of microcontroller, just getting started.
Programming ESP12E / ESP12F / NodeMCU With Arduino IDE Circuit Journal
The ESP8266 is like an Arduino with a builtin WiFi, the MCU and WiFi circuitry are in the same chip. Consider Arduino + WiFi Shield = ESP8266. In this instructable I will provide a step by step guide to procure and programming an ESP8266-12E WIFI Development Board.

ESP8266 Firmware Update Guide
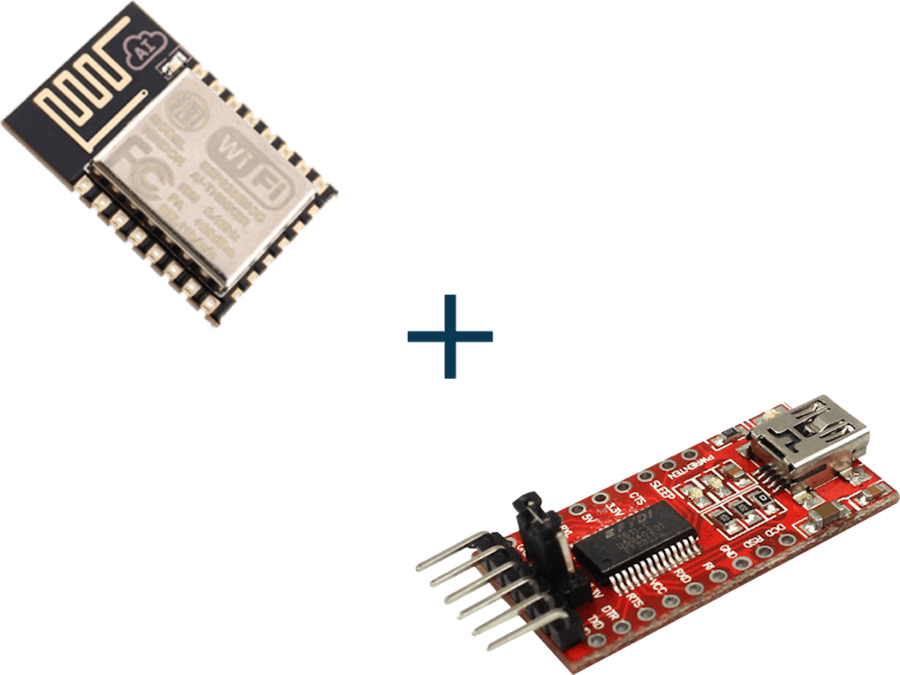
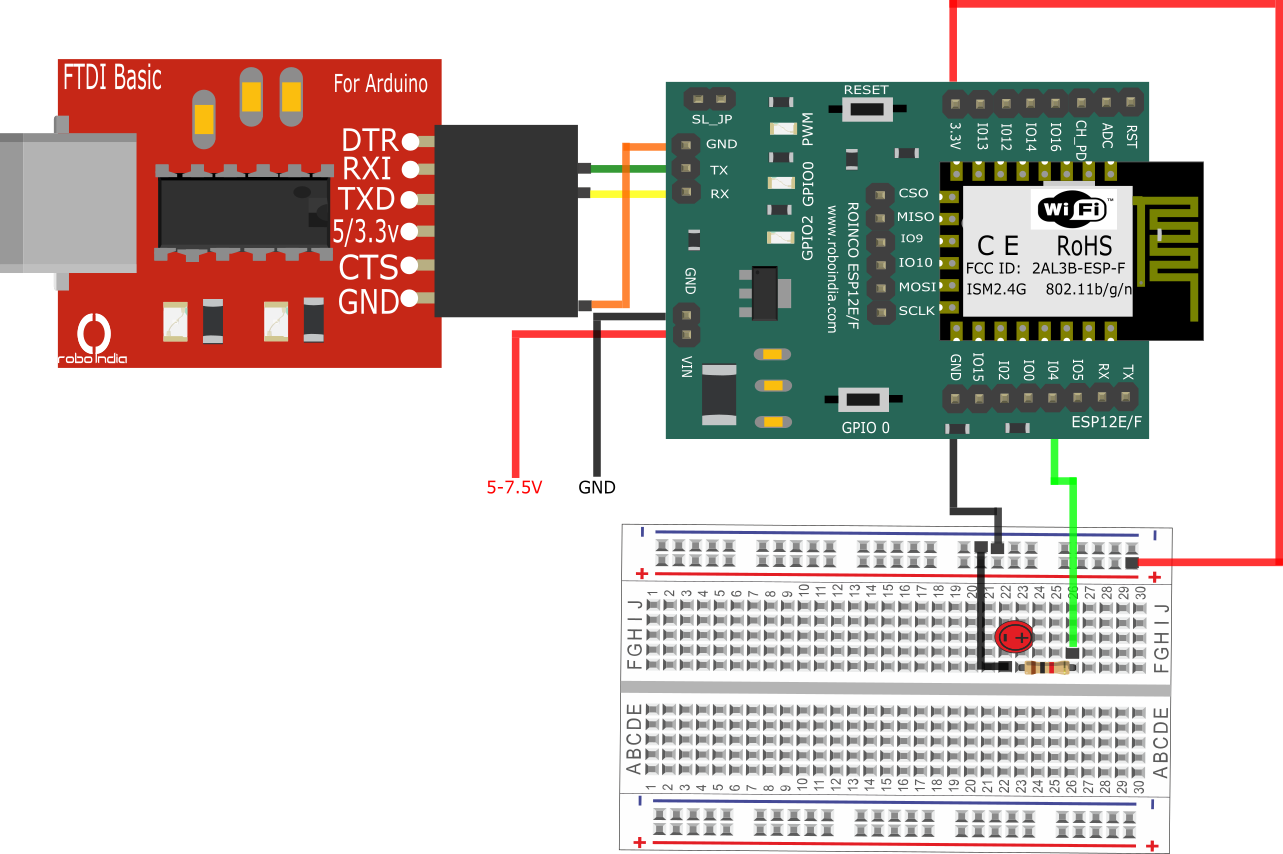
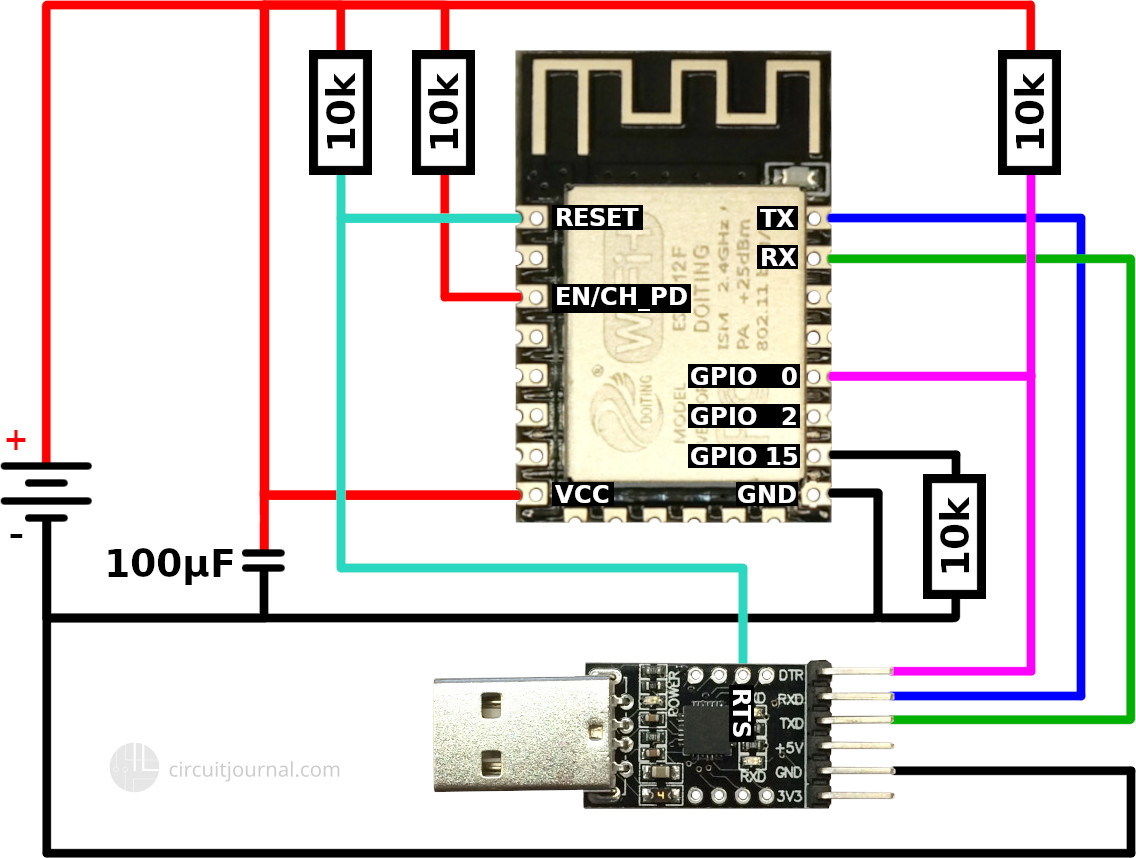
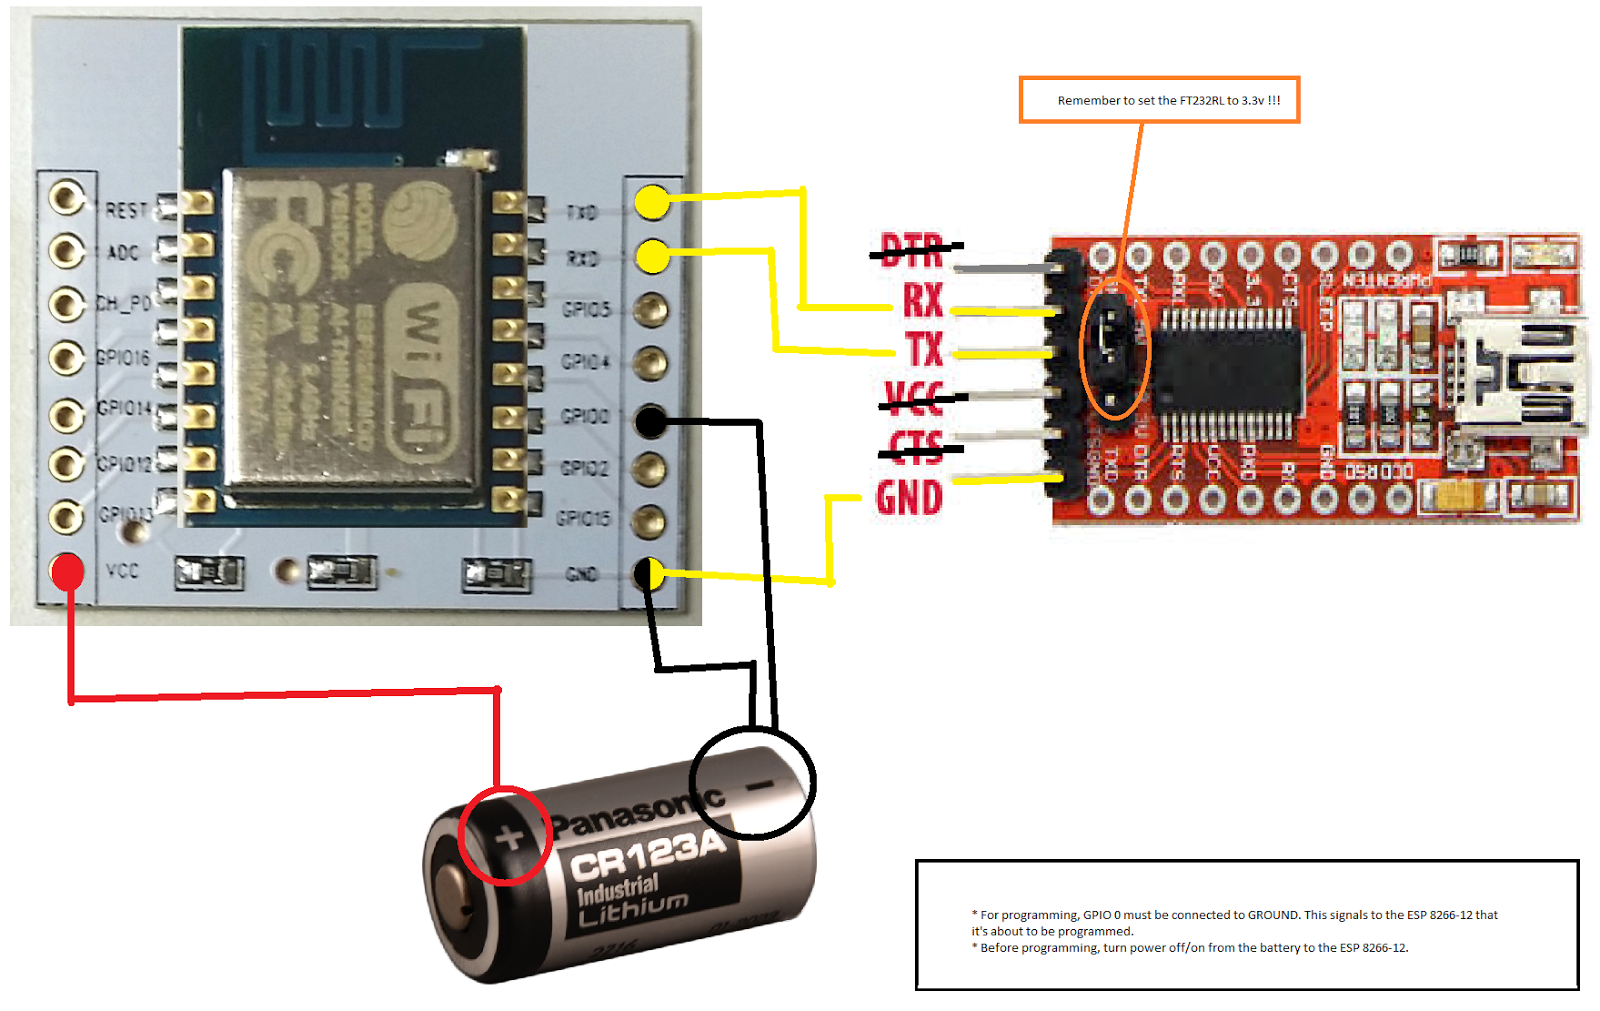
Using FTDI The basic way to upload code to the ESP8266-12e in standalone mode is by connecting it to an FTDI module. I took this one by Sparkfun. The connections are simple, but when searching on Google for "ESP8266-12E FTDI" I got many results that were either not written clearly, lacked a schematic diagram or were missing details.
How to program ESP826612E using Arduino IDE Hackster.io
The ESP8266-12 E/F module programmer used by the author is shown in Fig. 1. Fig. 1: ESP8266-12 E/F module programmer used by the author The process of designing and building a project using ESP8266 can be broken down into two distinct steps: hardware and software.

Solution Programming Esp8266 Esp 12e Nodemcu Using Arduino Studypool Vrogue
But Did You Check eBay? Check Out Esp8266 Esp-12 On eBay. Looking For Esp8266 Esp-12? We Have Almost Everything On eBay.
Electromania How to program ESP8266 ESP12E NodeMCU using Arduino IDE
1. Preparing Your Arduino IDE for ESP8266 2. Arduino Code 3. Connecting to ESP-12E/ESP-12F Board Via USB 3.1. Connecting a USB-to-Serial Adapter to ESP-12E/ESP-12F 3.2. Uploading Arduino Code to ESP-12E/ESP-12F With a Programmer Board 3.3. Uploading Arduino Code to ESP-12E/ESP-12F With a Witty Cloud Development Board 3.4.

How can I activate UART1 on ESP12E Everything ESP8266
VS Code and PlatformIO ESP8266 Pinout ESP8266 Inputs Outputs ESP8266 PWM ESP8266 Analog Inputs ESP8266 Interrupts Timers ESP8266 Deep Sleep Protocols ESP8266 Web Server ESP8266 MQTT ESP8266 ESP-NOW ESP8266 Wi-Fi ESP8266 WebSocket ESP8266 ESP-MESH ESP8266 Email ESP8266 HTTP GET POST HTTP GET Web APIs HTTP POST Web APIs ESP-NOW One-to-Many
technical stuff, hopefully useful to some Programming a standalone ESP 826612 using Arduino
We can reboot the ESP8266-12E/F in multiple booting modes by pulling up or down on specific GPIOs. In order to upload the firmware, we should first boot the chip in programming mode. The chip should boot in flash start-up mode during regular modes. As a result, we're just interested in the first two booting modes.